Wednesday, June 4, 2014

white linen denim Vogue 2900

May is over. Upon approaching to the end of Me-Made-May'14 challenge, I made a call for a meet-up and asked on twitter if any of participants could come to Tokyo on the last day to get together for celebrating the final day. Eight of us (including me) managed to come up to see each other under the very fine sky on that day. It was a really lovely day.

On the day before, I felt that I had no proper clothes for the meet-up (a very ordinary problem among us anyway). The thing was, by the 30th my options had run out because I had an undeclared rule for not repeating items during the challenge. Almost being forced, I sewed a new dress in the evening.

MeMadeMay14Day31

I sewed V2900 dress from Vogue Patterns again. In solid white linen denim. Wore it, loved it, and was glad that I sewed. ta-da! Today's report, done.


***
By the way, I once sewed a V2900 dress in plain woven white linen four years ago, and I'd say it was one of the most kindly recognized item of my handmade garments by non-sewists as well as by sewists. So I guess some of you may remember that dress too. And if you remember it, you may wonder whether I just replaced it with a new one because it was worn out or what is the difference.

Untitled


The answers are yes, and the grain lines. They have different grain lines. The former dress was cut in lengthwise straight grain. The new one was cut in bias. From similar fabrics.

Because the material and pattern are almost (but neither fabric or pattern was completely same, I have to mention this) identical, the dresses seem to look almost same when you look at them separately in the pics. However, you may find it interesting to see them side by side in the picture below. Don't they give different impressions especially on human body and especially side by side? We all know grain lines influence shapes in the garments, nevertheless, it is very interesting for me to find that they give such different impressions. I'm not talking about which one looks better, or which one is better on me. I mean one dress looks more casual and more fresh and the other does more manipulated and more mature on me, to my eyes. Your impressions on them may be different from mine, but it is not very important today, the important thing is to witness that grain lines affect a very significant ingredient of how people look, if I am correct.

please excuse me about the creases in the new dress. I should have taken care of them more.

V2900 innately has both options (straight grain and bias grain) and I know that it is not always the case for most commercial patterns. But still, I hope you have fun with seeing this example. I also hope you see it with your eyes half closed, so that you don't have to see the creases which weren't that bad in the real life...


Happy sewing!

Love,
yoshimi

Sunday, May 25, 2014

Some tips for indoor shooting and other thoughts from yoshimi the flying squirrel.

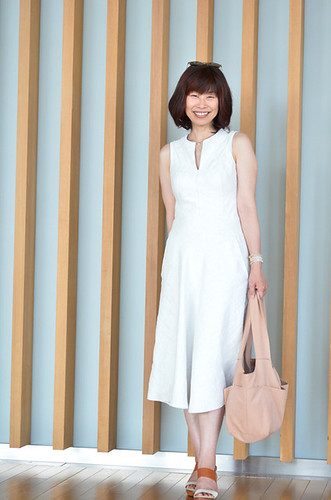
I'm recording my handmade outfit for Me-Made-May'14 challenge every day since May the 1st.


Until recently, I was taking my blog pictures mostly in a dark emergency staircase because I was thinking it was the only space I could use for my photo shooting on weekdays. Now I changed my mind and I'm trying to take chances of outdoor photos on weekends as much as possible, though, the long and sad indoor experience grew some clues for taking outfit pictures in darker and closed spaces in me. Although I can't be very helpful for you who have healthy lights or already conquered similar conditions to mine, I think it might be helpful for some of you who are struggling with indoor photos right now. I'm going to share some of my humble ideas on it today. I am very happy if you find this post a bit helpful.


Find the backdrop. Three angles to find your own.
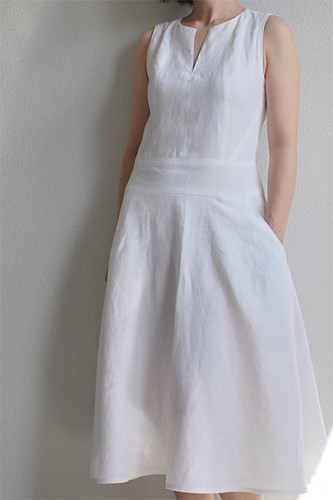
1. Less items
We tend to notice every item in a photo. I mean, the small electric socket there and the half opened curtain here. Especially in indoor photographs, such items can interfere with the attentions of viewers, even though we wouldn't care or look at them when we are actually on site. Eyes process much information to ignore the reality to "see" things efficiently, but they tend not to do it to the scenery in photographs. If you are a novice photographer and would like to get some simple and focused indoor outfit pictures, be conscious to find a frame that has miscellaneous items as less as possible, and have only some furniture that you can use as an effect in your frame.


2. Some lights.
You need lights. But my suggestion is this. Never use flash lights unless you know them well. Find your place near a large window and use it as your illuminant from front-ish side. Indirect lights usually give prettier results, as far as I know. We can also use bounce lighting for pretty pictures, but it needs more explanations, so I leave it untouched today.

3. Enough distance.
If the camera has a zoom, photographs taken from distance using long zoom would bring so-called "better" proportions of human subject in the pictures. Find your place where you can keep distance between the lens and you. Put the camera at between the levels of navel and chest, and slant the camera upward slightest much, especially when taking from head to toe pictures.

Think of "Portrait" function.
"Auto" can take pretty pictures, but if you are an adventurous amateur photographer and also if you have the function in your camera, try Portrait function and see whether you like it or not. More than sometimes the function gives smoother, brighter and prettier skin on the human subjects. I think no one has any problem with smoother looks of oneself in the pictures.

Try longer exposure after trying to find a large window.
I'd suggest to use AE mode to fix the lens aperture, and to try different exposures to check how your test photographs. You can fix the lens aperture to the smaller number, perhaps the second smallest one, so that you can get more light with shorter shutter speeds and also relatively shallow depths of field. Try "Automatic Exposure Bracket" to find the exposure of your favorite. Compact digital cameras have the function too. These photographs are my examples for test bracketing. I preferred +1 exposure to -1, and 0. I had a waist-high and large window on your right in the pictures.
-1EV
0EV
+1EV
Then I tried a second test with +0.7, +1, and +1.3 to go into details. I chose +1.3 and continued the photo shoot with this setting. I didn't go further with much longer exposures, but of course you can try longer ones if you need.

+0.7EV
+1EV
+1.3EV (chosen)

*The first set of three was taken by my Canon compact digital and the latter was taken by my Nikon DSLR with a zoom lens. I just wanted to show that we can do the same thing with whichever cameras that you own.


Think of dropping but not keeping.
Keep some but not all of the photographs taken, otherwise it may start coercing your freedom to shoot freely, eventually. Make some efforts for selecting very small number of better ones among many right after shooting. It grows the skill of choosing your camera setting too.

Suspend white balance until next time.
It all depends on the site. Just know that there are options and you can surely change the white balance etc for different temperatures. But it may be OK to learn it later.

Last but not least, be relaxed.
This is the suggestion 100% same as how Margo started in her brilliant blog post about taking outfit photographs. I cannot agree with her more. In my opinion pictures tell things much more than one would think. When talking about portraits and such, pictures are good at highlighting the smallest frictions when your facial expressions are not linked to your heart. They don't tell what exactly the situation in the "real" site is, however, people discern such and such over pictures and smell dubiety instantly. I mean, if you would like yourself smiling in the pic, you have to smile at heart. Otherwise people would sense that you're not smiling and you are pretending, which has the opposite effect. People are enough clever to distinguish shy smiles from pretentious smiles. If your face is looking at somewhere away awkwardly, people think you are resisting from telling how you actually are. I don't know how we do, but we do. If you would like viewers to be interested in you, you have to try to make efforts to be someone who is interesting instead of asking them to think that you're interesting.

The closest way to control the situation is that becoming the person who you'd like to be and then making yourself relaxed about it, unless you're a professional. By the way, I don't think it is stupid to smile at cameras for your sewing records/blog reports/etc. When you are photographed for the purpose of telling your friends how well you are doing, you have a fair amount of reasons to do so. And it's good to present real "you" to the camera, even though your camera is a mere machine on the tripod. It maybe silly, but it is no harm to anybody. Who cares, we can live our lives only once. (I want to time travel and tell this to me myself from ten years ago. Ha ha)


Have a happy day!

Much love,
yoshimi

Sunday, May 18, 2014

Eva skirt

I'm blending into the flowers.

I've been taking photos of my daily outfit every day for about half a month, as I'm joining Me-Made-May'14 as usual. I'm feeling very happy and also super busy!

At Me-Made-May'14 Flickr group, I try to leave comments, "like"s or anything similar on other participants projects as many as possible, but it is quite difficult to commit it as much as I'd like because the party is huge. I think I need 50 hours in a day if I try to do everything I need/want to do in my life at this moment. My other blog, photo maisonette, with Carolyn is importantly having the final month for uploading our photographs too, and it makes me feel that time flies like a shooting star. I hope I am not going to be burned out like a shooting star, by the way, it is just a silly figure of speech. I love my silliness.


*
I sewed a skirt using my newly bought Eva dress pattern from Tessuti. I was planning to make a dress at first, in this African wax print fabric, but I failed to make adjustments of the Eva's bodice in this kind of fabrics. FYI, Eva calls for softer fabrics and I am not saying that the pattern is difficult to fit using right fabrics. After making 6 unsuccessful toiles of bodice in similar firm cotton to my African print, I gave up a dress and made this skirt from Eva. I simply sewed the skirt and put casings for elastic at waist so that I can pull it on. I made a tank top blouse with remnants too. I'm very happy with the result! Eva's skirt is cocoon-shaped and I think it is very charming and worthy of special mention!


Happy sewing to you, friends!

Love,
yoshimi

=====
Skirt: Eva from Tessuti
Tank top: old pattern
=====

I finally had an extreme ironing session(fake)

Saturday, May 3, 2014

big baby blue culottes


Hi!
The other day, I sewed a pair of culottes from a new pattern and I really liked the result. I wore it on the next day and asked my husband to take some pictures of happy me in them, and what I found was that all pictures were out of focus. A very typical happy story...

The pattern is Shamrock from Tamanegi-kobo. These wide culottes have an elastic waistband and they were easy to sew. I think I'll make more pairs in the future!

The only alteration I had was for the back pockets. I added a pair of big patch pockets under the original mock flaps to make them less mock.

Have a great month, dear sewists!

love,
yoshimi

the cocktail was good anyway

Sunday, April 27, 2014

shirt wave


Hello!
Spring means "new shirt" to me.

It does mean so for a long time, and this year I sewed three shirts in a row. To tell the truth to you unnecessarily, though I like making shirts and I often sew them for my sister who loves shirts, I've never thought that I am a good shirt wearer myself. However, no matter how I am bad at wearing them, spring has been the time for thinking new shirts to me, because I seem to be firmly programmed doing it by the Force.
(2013)(2012)
(2011-2)(2011-1)
New shirts in spring make some kind of people so happy so instantly. If they're self-made, they're even more effective.


Anyway, I sewed all three shirts using the same old pattern but made them have different lengths of sleeves. Long, under-elbow, and half sleeves. They have minor differences in insignificant details too. The pattern is a very basic shirt pattern from a Japanese company, MPL. It has an option for under-elbow sleeves, that's the main reason why I chose it for this time. (But it is no longer available because it's very old and already out of print.)


I used cotton fabrics, one was in off-white and having organza flowers all over, another was Liberty Tana lawn in cheerful flowery print, and the other was a partially light blue-dyed light brown firm cotton with blue brush print I bought in Australia, at The Fabric Store. I omitted collars from all three shirts like I often do, because I knew that I'd look slightly better without collars. Salute for DIY spirit!


So my spring task is all done.
I hear my inner voice now, may the Force be with me and everybody else!


Wishing you a very happy sewing and a great weather,

yoshimixoxo


Friday, April 11, 2014

sequin clutch bag


If your fabric is too gorgeous or too small, how about making a clutch?

click small photographs to enlarge

size: 15 x 24cm


Happy sewing to all of you!
xoxo

yoshimi


P.S. I'm joining in Me-Made-May 2014. See you there if you're coming to the party!

"I, yoshimi of yoshimi the flying squirrel, sign up as a participant of Me-Made-May '14. I endeavour to wear handmade clothing every day for the duration of May 2014. I will also try to use all my seasonal appropriate handmade garments in this challenge, to review my past sewing projects."

Monday, March 31, 2014

candy colors


I recently sewed three copies of V-neck linen jersey tops using Fujiko top pattern from Tamanegi-kobo. I made one with a blue fabric first, and realized that it would be nice to have another one in a different pretty color as I found the candy colored top very useful.

By the way, the pattern Fujiko always makes great tops for me. The pattern construction in the shoulders of it is very clever, and I don't need shoulder adjustments that I normally need to apply to most top patterns. I have proportionally narrow shoulders with a proportionally bulky upper torso and arms, and if I choose my size for jersey tops looking at the bust measurements I mostly need to grade the shoulders narrower, to make myself look neater around my shoulders. Fujiko has similar sleeves to raglan ones construction-wise. However, it looks like having neat set-in sleeves in the front view because of the unique curves in the shoulder seams. This type of shoulder construction is very permissive and allows me to fit my shoulders perfectly in the garments without pattern alterations or a careful selection of suitable jersey fabric. You may like to have a look at the technical drawings of the pattern here, and my first blog post for the pattern with a few photos here, if you are interested.

(additional notes 31/March/2014 : Fujiko pattern calls for 4way stretch jersey as recommended fabric, but it is so probably because the pattern is originally for a bodysuit. Most jerseys are OK for making a top with the pattern, as long as I am concerned. )

So, I love Fujiko. I felt I needed one more in another color after the second one, again. Lastly I sewed the pink one. I'm sure I'd have loved making more if I had more of the same fabrics in different candy colors. But it had to be stopped because of the lack of my resource. Three is a good number for everything, anyway!


By the way, I applied those V-neck bindings by a simple method that you can watch here. I baste a small portion of "V" area using straight stitches in the shape first and then attach the whole strip with overlock stitches. (In the video, straight stitches are used for attaching the whole strip but I prefer using my 4-thread serger except the basting.) Never forget to put a small patch of interfacing as a reinforcement on the wrong side at "V", in case you'd like to have a first try.


I wish you a very happy week!

Love,
yoshimi


I also finished a pair of green pants and I'll make one more in light blue very soon :)