Sunday, May 15, 2011

tiered skirt


***
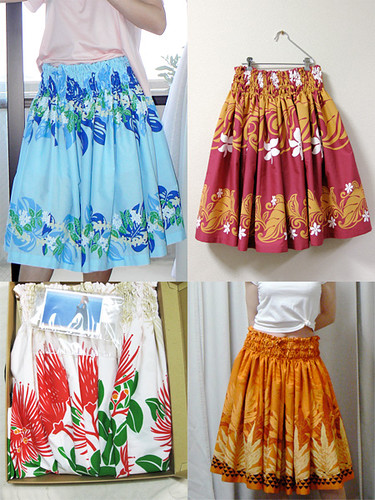
Since I bought my Bernina, I've been sewing Pa'u skirts for my mother.

She's been attending Hula dance class with her friends once in every two weeks for some time, and she likes to wear Pa'u skirts there. I've been enjoying making her birthday presents, one by one, once a year, to give her a new dancing skirt. And also I often enjoyed trying them on *for just checking* before sending them to her...
pauskirt

***
However this year, although we still love this small tradition between us, we finally decided to choose some different present. (The reason is obvious. She now has too many of them in her closet.)
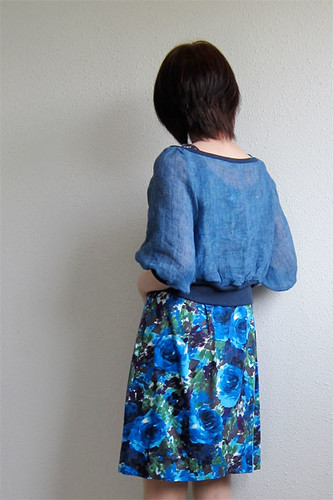
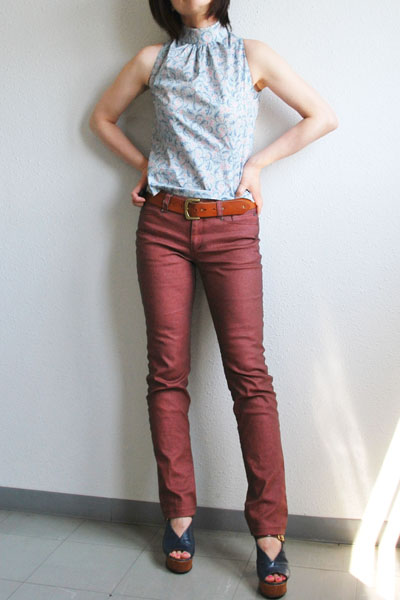
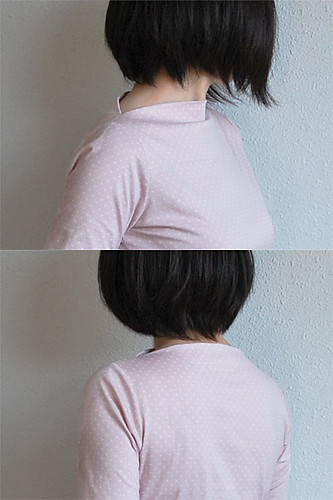
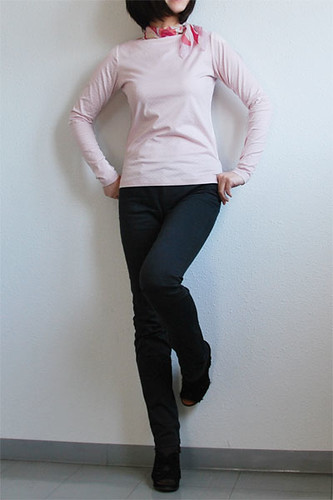
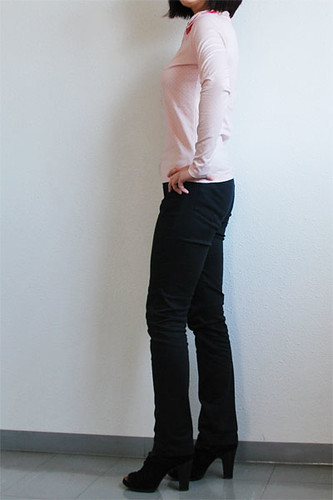
So, instead of making her new skirt with the enthusiastically elastic inserted waist band, I gave her a tiny birthday present that she requested, and made this tiered skirt for compensating my now-meaningless passion. I can't dance, I only wiggle, so I just needed a small amount of gather and bulk in my skirt, but I hope you can see my inspiration from Pa'u skirts in it.

I used 1m of white linen for it. (Each of her Pa'u skirts was made from exact 4yards=3.6576m of cotton/polyester.) Yes, I tell you that linen fabrics crease very easily as you can see. However, thanks to the gathers everywhere, creases in this skirt didn't bother me much after a long day. I actually like this fabric very much, it flows kinda elegantly in a maximum way of being a casual fabric. The skirt has got three rows of elastic castings at waist, and it sits very softly and comfortably on my tummy. This will be a lovely weekend skirt for staying-in at home.

***
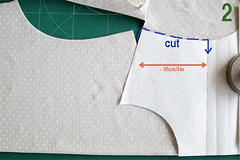
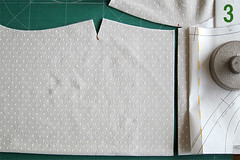
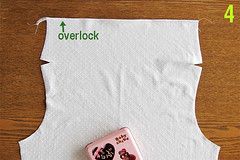
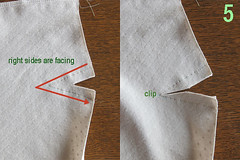
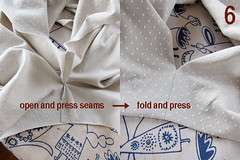
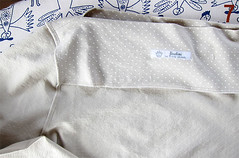
By the way, I didn't use any pattern for this casual skirt, but cut the fabric in 6 pieces of rectangles and sewed them together.
I made a diagram of my pieces, for your reference, in case you'd like to make similar one for you.


Happy sewing!
Happy birthday, Mum!

yoshimi

Tuesday, May 10, 2011

Coral

Coral is the name of this blouse.
Correctly, it's the name of the pattern for this blouse.


Originally, Coral has got a set of pretty cool asymmetric sleeves. Because I love being rather boring as you probably know, I made my version have one symmetric set of left sleeves on both side, like most blouses in the world have. I think the result turned out a cool and beautiful top in spite of my big effort. Too bad...

=====
Coral blouse
pattern:
  Coral from TAMANEGI-KOBO (PDF pattern)
size38(JP9). Symmetric use of the left sleeve to both sleeves. Lettuce edge execution for sleeve hem. Overlock binding at hem and neckline.

fabric: Polyester georgette, light, thin, sheer, off-white, flowery pattern. Cotton/polyester jersey, light and smooth, T shirt-weight, pastel pink, stretches well, for hem and neck band.
=====
I think I need to make another one with asymmetric sleeves, too. This is a fun pattern, which makes feminine summery blouses.

You can also read the post for the red pants here.


**By the way, do I have to make supplementary notes when I'm kidding? I hope not. I hope you got me in what I wrote above! Ah, it's extremely complicated and embarrassing to joke in foreign language. I always have to ask everybody if they realized that I have made a joke. sigh.**


Talk to you soon,
Love,
yoshimi

Monday, May 2, 2011

Linen gauze cardigan blouse

Hello!
110502-5v2
I've got a small piece of indigo linen gauze, and I couldn't think anything but making it into a cardigan blouse. I imagined it would make a very nice casual and feminine light jacket-like cardigan blouse (sorry for my wobbly English!).

And I think it did.

The most recommended fabric for the pattern I used was light jersey, but my fabric was a thin and coarse linen gauze. It resulted a pair of air-filled sheer sleeves, as I wished.


110502-14

This time to assemble, I combined the jersey waist band and the woven bodice by overlocking together. Like we do all the time to the combination of jersey waist band and jersey bodice. However, I've learnt that I'd better to baste my woven bodice to make it slightly gathered before attaching to the jersey waist band, instead of simply binding them together. Otherwise, I'd get my soft waist band too stretched and the least neat gathering on the bodice, like I did. I think it looks a bit untidy in the end, because I have chosen the wrong strategy on my coarse gauze. Experience is the best and real teacher, indeed.

Photo below: The sleeves were basted to make gathers before serging, but the bodice was bound to the waist band straight away. You see the difference, don't you. Maybe I'll fix it, but maybe not. You know what I mean.
110502

That said, I'm loving this blouse overall and so much. I'm sure I will use it very often. I'll also try the pattern again, with a bit of wisdom which I didn't have!

=====
Linen gauze cardigan blouse
pattern:
"Rachel" cardigan blouse from anneedeux* (PDF)
size38. Shortened the bodice by 5cm.
fabric: Linen gauze, thin, light, coarse, indigo. Cotton jersey, soft and smooth, stretches well, good T shirt weight, dark blue.
=====
The jersey dress was one of my last summer's creations.

Happy sewing to you!

Love,
yoshimi


P.S. Thank you for your compliments on my shoes in the past posts. I know you're wondering if I own other pair of shoes. Your feeling is right. I have no other pair. (No you can't!)

P.P.S. There is something wrong going on with my DISQUS at this moment at least in my environment. If you would like to leave a comment but don't find the comment column anywhere in the front page, please click "the updated time" or "title of the post" to follow the link to the individual post page and you will see the comment column at the bottom. I'll sort out this problem ASAP. Sorry for this inconvenience.

Thursday, April 28, 2011

Birthday Blouse and Red Jeans

110428
Yes, I'm pretending a punk.


5 days ago, I bought this red denim in Tokyo. As I had been wanting a bold and bright red pair of slim jeans, (I'm not sure if I was sober when the idea hit my brain though,) I was looking for some nice red-red denim in the Nippori fabric district. Despite my frantic search of it, I couldn't find any of red denim other than this dark punk glittery smelly fabric. Because I am a type of person who is very easy to be satisfied with alternative plans, I changed my mind happily and brought it home with a big smile.

And then, my smile grew even bigger when I got home, to find Hélène had sent me my birthday presents. Yes, it was my birthday! She sent me two pretty fabrics, some beautiful threads, and her love. The fabric for the blouse is one of her presents. Punk pants are also here for frightening you in the picture. I guess you are laughing at me thinking how quickly I used these fabrics. Never mind.


Have a good day!


110428-12
=====
Birthday Blouse
pattern:
573 high neck sleeveless blouse(discontinued) from anneecotton*
size40, down graded to 38.
fabric: fine cotton lawn, probably least of stretch, beautiful organic pattern
=====


I love my handmade jeans.
They are the comfiest things ever in my life.
110425-1
=====
Red Slim Jeans
pattern:
stretch skinny pants from pumila
size 9, lengthened by 5cm, front jeans pockets with a little coin pocket, rear patch pockets.
fabric: stretch denim, black red, glittery, rather hard, thick, stretch moderately.
=====


Much love,
yoshimi

Tuesday, April 12, 2011

Amy long cardigan and bell bottom jeans


Long cardigan


pattern: Amy S. #6028 from BurdaStyle (PDF)
size 34(1-2 smaller size than my measurement size), lengthened, added a front opening and plackets, one hidden hook & eye for closure
fabric: cotton lace jersey, white beige, light, very stretchy because of the lacy texture

I stole an idea of making cardigan from Amy pullover pattern from my dear friend Kapo. I was almost successful to threaten & snatch her gorgeous pink cardigan that she sewed from the pattern in the last summer, as you see in the picture, but I failed. (She snatched it back from me afterwards.) I guess I should have threatened more. Sometimes she is so very stingy like this.

Kapo's pink cardi
*In case you are suffering from my poor English, I let you know that I'm joking. She is the most generous lovely pal and I adore this beautiful friend. Of course, she is not the one who is miserly, but the other is.

Bell bottom jeans

pattern: stretch skinny jeans from Pumila
my skinny jeans from this pattern can be seen here and here.
size 9, pants narrowed at knee, hem lengthened by 10cm, hem very widened (hem width 30cm)
fabric: cotton stretch denim, PU blended, indigo, heavy and thick
I found that it was easy to make alterations onto my favorite skinny jean pattern. It can be a platform for any style of jean pants, and I love the fact.


xoxo
yoshimi


*P.S. Where I live, wearing a hooded jumper in public is not very controversial, and in fact, there are many grown-ups who love the casual style. Needless to say, no one wears it with its hood up. Babies may do, with a pair of bear ears, occasionally.
(200X300)

Thursday, March 31, 2011

March 31

20110331
Day 31.
Me-made white shirt, pattern TAO from Tamanegi-kobo
Me-made leggings/pants, pattern Blackspinel from Tamanegi-kobo


Regrettably I have a huge gap of days in my MMM project album.
But I know that I'm quite a self-stitcher and I can prove it next time. (*^_^*)

=====
White shirt
pattern:
TAO from TAMANEGI-KOBO (PDF)
size 9, front short placket, stand collar, lengthened by 10cm, bias grain cut
fabric: off-white cotton lawn, very light, woven plaid, sheer
=====
TAO
=====
Stretch pants
pattern: Blackspinel stretch pants from TAMANEGI-KOBO (PDF)
waist-hip size38, legs size40, lengthened by 3cm
fabric: khaki stretch cotton twill, slightly stiff, middle bodied, stretch well but not very well
=====
(I was surprised to find that they were naturally so 3D even on a hanger. And believe or not, they are THE elastic waist band pants.)
Blackspinel
Blackspinel


Thanks for your visit!

Love,
yoshimi

Wednesday, March 23, 2011

an easy type of self-facing straight neck


Thank you very much for your help, and for your response to the last blog post.

Please check what I wrote in it if you haven't read it, as there are still some days before the ruffle is closed. I am greatly thankful, not only for your donation, but also for all your kind attitude. It is helping us in every sort of ways to recover, I hope you understand what I mean. To know that we have your helping hands makes us positive and the situation inevitably better.

Today I'm going to share with you a tutorial post for making an easy straight neck T shirt. I prepared it some time ago, but I didn't think anyone would like it. I thought so because it was too simple to impress you sewing nerds. But I'm changing my mind. I think you might like it, for a change.
***
how to alter a crew neck to an easy type of self-facing straight neck


I've been inspired by the construction of neckline of Wilma pullover and adopted it to the common T shirt. They use the extended bodice as a self-facing. This type of neckline doesn't require any binding finish, and thus it is technically very easy to make. I also found this straight neck T was more feminine than common crew neck Ts on me, which was a bonus. What we have to do for clean appearance is being careful to choose fabrics that don't roll up at edges too much, because the self-facing will not be sewn or fixed to the bodice.
neckline
You need to be ready with your own favorite pattern for common type of T shirt.

Cut bodices with the fabric on fold, but leave some of shoulder line and whole neck line uncut. Note that the neck opening will end much nearer to the front center than the point where cutting is stopped.
selffacingneck1
Flip the pattern horizontally on the fabric with the fulcrum at the neckline, and continue cutting like tracing the mirror image of bodice until reaches about 10cm/4in in length. This mirror image area will be a self-facing.
selffacingneck2
selffacingneck3
Overlock the straight edge of self-facing.
selffacingneck4
With the fabric right sides of the front and back piece facing, sew shoulder seams and clip the seam allowances towards the point of neck opening ends.
selffacingneck5
Open and press seam allowances, neaten self-facings before sleeves attached.
selffacingneck6
Attach sleeves, close side seams and finish as desired.
selffacingneck7
selffacingneck8
This neckline is least revealing and most unsensational, but I think the top looks feminine and lovely when on human.


You can't see it much in my pictures, though (sorry).


Love,
yoshimi

(P.S. Please accept my apology about the inappropriate word to describe you great people in this post.)